连续绘制图块
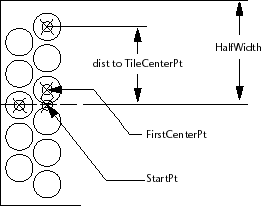
现在你已经有了绘制路径的逻辑,下一步就是弄清楚如何在每一行中绘制图块。在下图中,显示了两种情况:一行与路径中心的偏移量等于 0.0,另一行的偏移量不等于零。请看一下图表,然后阅读下面的伪代码。  Set up variables for StartPoint, angp90, angm90, and so on.
Set the variable FirstCenterPoint to the StartPoint + offset amount
(which may be 0.0).
Set the initial value of TileCenterPt to FirstCenterPoint.
(Comment: Begin by drawing the circles in the angp90 direction.)
While the distance from the StartPoint to the TileCenterPt is less than the HalfWidth:
Draw a circle (adding to the accumulating list of circles).
Set TileCenterPt to the next tile space increment in the angp90
direction.
End While
Reset the TileCenterPoint to the FirstCenterPoint + the tile space increment at angm90.
While the distance from the StartPoint to the TileCenterPt is less than the HalfWidth:
Draw a circle (adding to the accumulating list of circles).
Set TileCenterPt to the next tile space increment in the angm90
direction.
End While
Return the list of circles.
|
 |Archiver|CAD开发者社区
( 苏ICP备2022047690号-1 苏公网安备32011402011833)
GMT+8, 2026-1-18 07:35
Powered by Discuz! X3.4
Copyright © 2001-2021, Tencent Cloud.